


One of the biggest mistakes I see business owners make when using Pinterest is that they are not creating enough content! And I don’t mean blog posts – I mean creating Pins! Creating multiple Pinterest pins for each blog, freebie, or landing page allows you to reach more people, quicker! Plus, it also helps with your Pinterest SEO, without adding hours of blog writing to your to-do list. In fact, you can create two weeks of Pinterest content, from a single blog post. Yes, 14 days of content, from one blog post!
It’s okay to create multiple pins
I often get asked if this will be seen as too spammy – creating multiple pins for one blog post. And the answer is: no! In fact, Pinterest encourages it! “It’s okay to have multiple Pins that land on the same destination. In fact, it’s good to save a variety of images that appeal to different types of Pinners.” – Pinterest.
By creating multiple Pins, you are allowing your Pins to target and appeal to different Pinterest users, while growing your engagement organically.
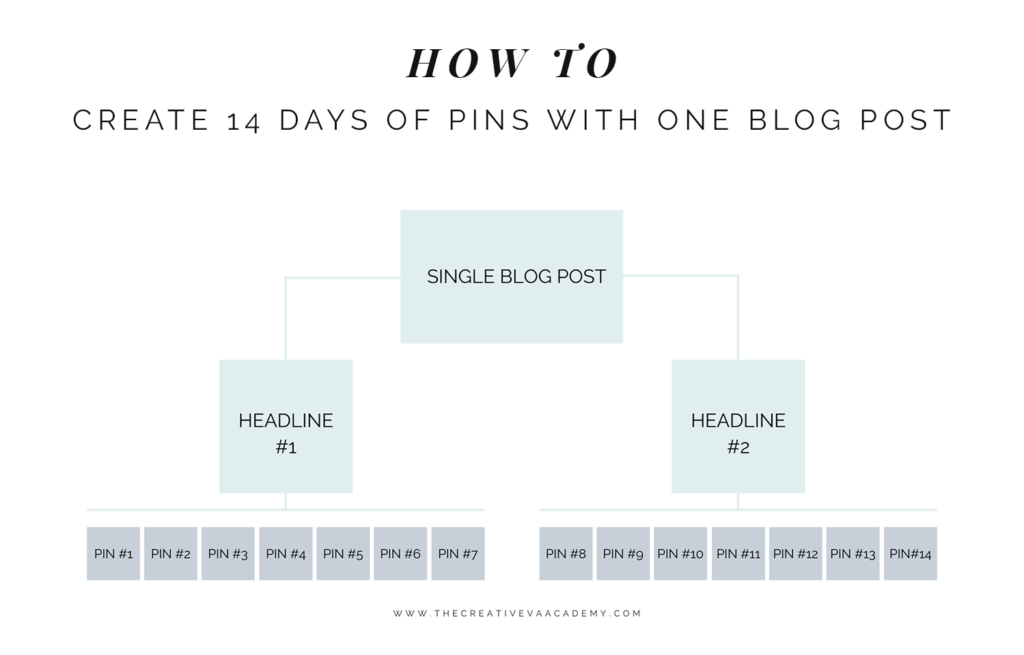
Create 14 days of Pins with one blog post
While I suggest you blog once per week, I know this might not be possible for new Virtual Assistants or business owners. As a virtual assistant and digital marketing pro for wedding professionals, I know how long a blog takes each week! So, let’s say you are blogging twice a month – how do you fill up your Pinterest calendar with just two blog posts?
Easy! You create two weeks of content for each blog post. So how do we do that?
1 Blog Post x 2 Headlines x 7 Pin Graphics = 14 Pins
Step One: Create captivating headlines
While my outline above shows you making 2 headlines, feel free to make 2-4! It’s best to test out multiple headlines to see what performs the best on Pinterest, so you can adjust your strategy as you go. I have a spreadsheet that outlines all of the headlines I use on Pinterest, and each month I check analytics to see which headlines and Pins are performing the best. This way I can make sure to adjust when needed, and change what isn’t working! This headline will be going on your Pinterest graphic, so make sure to keep it short and concise.
For example, let’s say your blog post is on how to create the best Instagram Bio. This will be great for a variety of businesses and could attract multiple audiences. (P.S. The headlines below are all Top Pinterest search results!)
Headline #1: 5 steps to write the best Instagram Bio
Headline #2: How to write the perfect Instagram Bio
Additional Headline #3: How to write a killer Instagram Bio
Additional Headline #4: Instagram Bio’s that convert
Step Two: Make graphics for your two weeks of content
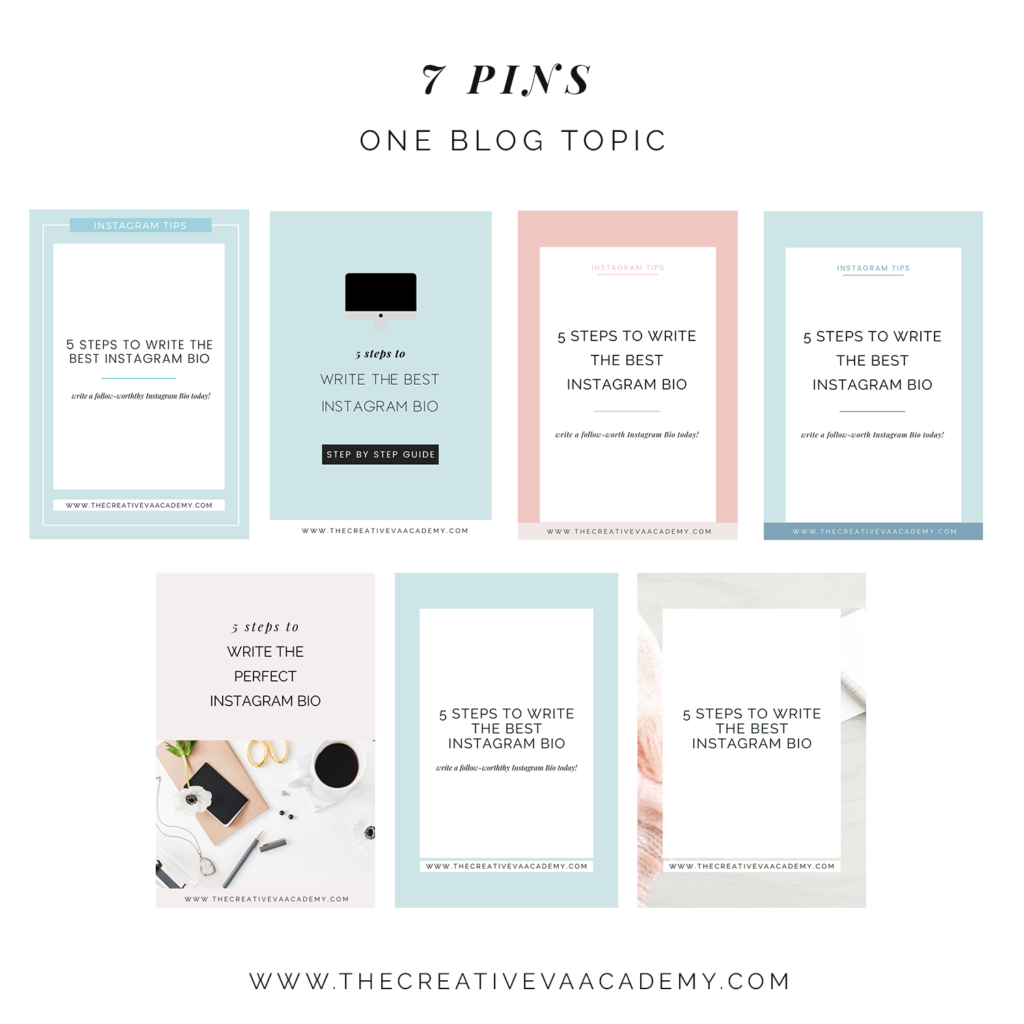
Now that you have the perfect headlines, it’s time to make the Pinterest Pin! Experiment with text, style, and colors, but don’t stray too far from your site design and branding. I personally like to experiment with my brand colors, as well as different images. This also allows you to run A/B testing with your colors and images, to see what works! The spreadsheet I mentioned above? It also has a column with what color works best (For me it’s soft blue and blush pink!)
As you can see below, I have created 7 pins from the single headline “5 steps to write the best Instagram Bio”. Some have subheadings, but the themes and my brand guidelines stay the same. The fonts are all the same, and the colors are similar.
Step Three: Create multiple descriptions
Take advantage of a Pinterest SEO boost! With each new pin, change the description. By writing a variety of descriptions for your pins, you are able to test out different keywords. And the spreadsheet I mentioned above? It includes a column for the best keywords! This will not only help add variety, but can also increase the reach that pin gets. Adjusting the descriptions can also allow it to show up in different search results in the Pinterest Smart Feed.
Step Four: Schedule two weeks of content in Tailwind
Now that you have two weeks of Pins, how do you share it? Easy, you use Tailwind! While I go over all things Tailwind here, I’ll share how easy it is. It’s important to not have these pins go up all at once. Instead, you want to schedule them out to go up one each day, or even every other day. To do this, you will want to use the scheduler tool.
- Upload the pin right into Tailwind. To do this, go to the Publisher view, and either click on “Add a new pin” or click and drag the image right in.
- Select what board you would like for it to go to.
- Schedule when you would like it to go up. I recommend you use the Interval Tool if you are sharing to multiple boards, to ensure that they do not go up all at once. To use this tool, click on the Clock (this will come up once you select multiple boards!) And adjust the interval. I normally do this for 2-3 days from the original pin. This will “lock” it in your scheduler.
- Add the description.
- Add the title.
- Insert the URL to the blog post (don’t forget this step!)
- Add to your queue, smart loop, and tribes.
Now your two weeks of fresh content are up and ready to go, all in just minutes. Looking to try Tailwind? Click here, and get one month free!
Keep track of the results
It’s important to keep track of the results. I recommend creating a spreadsheet in GoogleDocs, where you can easily access each month. This way you can track what colors, pins, keywords, and images work. This will allow you to always be creating the best pins, and change as trends change!
*this post contains affiliate links. These links do not add any fee to you using and may compensate The Creative VA Academy and Ava And The Bee.

